
Creating Video Content Part Two: Behind the Camera

Welcome to part two of my series on overcoming the hurdles to making video content. In my last blog, we discussed dealing with work at the camera level. We talked about preparing to make content as well as how to overcome stage fright and getting in front of the camera. Today will be a bit brief, and a bit more technical. With that said, I am by no means a computer guru. This blog is meant to be a starting point; to show you that creating video content isn’t as far away as it might seem. This blog will get you into creating video content with only the items you already have in your possession or can get for free. If you find yourself intrigued after working your way through this blog, then please, get on YouTube and dig away at the wonderful world of editing.
4 Easy Steps to Create Free Video Content
Because who doesn’t like a good list?
1) Gather All Your Things – Phone, Computer, Internet
If you’re reading this then I can only assume you have access to internet, and either a phone, computer, or both. Perfect! That’s all the buy in you need! The rest of this project is 100% free. For your most basic videos, you can do all our filming using either a computer webcam, or more likely, your cellphone. If you choose to record on your phone and want to use your computer to edit (my recommendation) but don’t have access to a data transfer cable, go ahead and make yourself a Google Drive, Dropbox, or some other free cloud storage account so you can transfer the video between devices. That way you can access it on your computer hassle free.
Note: While not a necessity, I also recommend finding yourself something to use as a tripod. The ability to go hands free with your shots frees you up and allows you to get more creative.
Example: in a recent video project that I was working on, my mission was to create a piece of video content that updated our target market on a donation campaign while also making a plead for them to continue donating. Because I had access to a tripod (actually, just a cellphone neck holder a roommate gave me as a gag-gift) I realized that I could shoot multiple camera angles from a stationary position. This got me thinking about making a parody news-broadcast.
2) Plan Your Content
This was already mentioned in the previous article. Even so, I really must reiterate the importance of solid planning. A script (or at least a list of talking points) helps an actor to make sure they introduce all the concepts that need to be introduced during their screen time. In traditional film, an editor would use a story board to help in much the same way. We won’t need anything so formal as a storyboard, but a brief outline of the order you want events to unfold will give you guidance when it comes time to trim, cut, or delete footage.
Example: I finished shooting my news broadcast. Because I had limited memory on both my phone and computer, I needed to delete footage as I realized that I wasn’t going to use anything from that take. Part way through my editing process I discovered that somewhere along the line I had cut out an important segue that connected the campaign to my personal testimonial where I would be making a case for why/how donations helped the cause. Suddenly I had a choice to make: Do I reshoot, try to edit around it, or scrap the idea all together?
3) Editing Your Content
Learning how to edit like a Hollywood professional is a lifelong endeavor which is well beyond the scope of this article. Instead the goal here is to get your hands on your entry level tools that are free to use. I don’t have a lot of hands on experience with Apple products, but I’ll be trying to share what I can, or other resources to help you on your way.
Note: Here are a few words of editor jargon that you’ll want to know…
Cut – the ending of a shot.
Split – separating a single shot of footage into two parts.
Splice – the joining of two pieces of footage.
Transition – how two pieces of spliced footage move from one into the other.
Title Card – a shot where the text on the screen, created in the editing process, is the primary focus of the viewers attention. This does not include subtitles.
Import – the process of bringing digital media from one location to another with the intention of further editing. E.G. Putting a copy of footage and/or music into your editing software.
Export – the creation of a finalized copy of edited material which is ready to be distributed. E.G. A video that is has been edited to completion being exported to an MPEG4 file, which can be then uploaded to YouTube.
Mobile Editing
Not my preferred method, but still an option out there. Apple and Android both have a plethora of selections out there, from preinstalled software to app store downloads, from free to paid. Each option out there presents its own advantages and disadvantages. HubSpot recently put together a piece on the top 20 mobile app editing software options out there. I recommend you click here to find out which option best suits you.
iMovie – Apple
Actually, iMovie can be used on any Apple device, making it a great choice for someone who only wants to learn one software. Better yet, you can edit the same footage on any of your Apple products and pick it up on another one. This means you can hammer out work on the bus using your phone and do more involved edits on your iPad or laptop when you get home.
iMovie is the default choice of grade school film classes everywhere for its easy to understand interface.
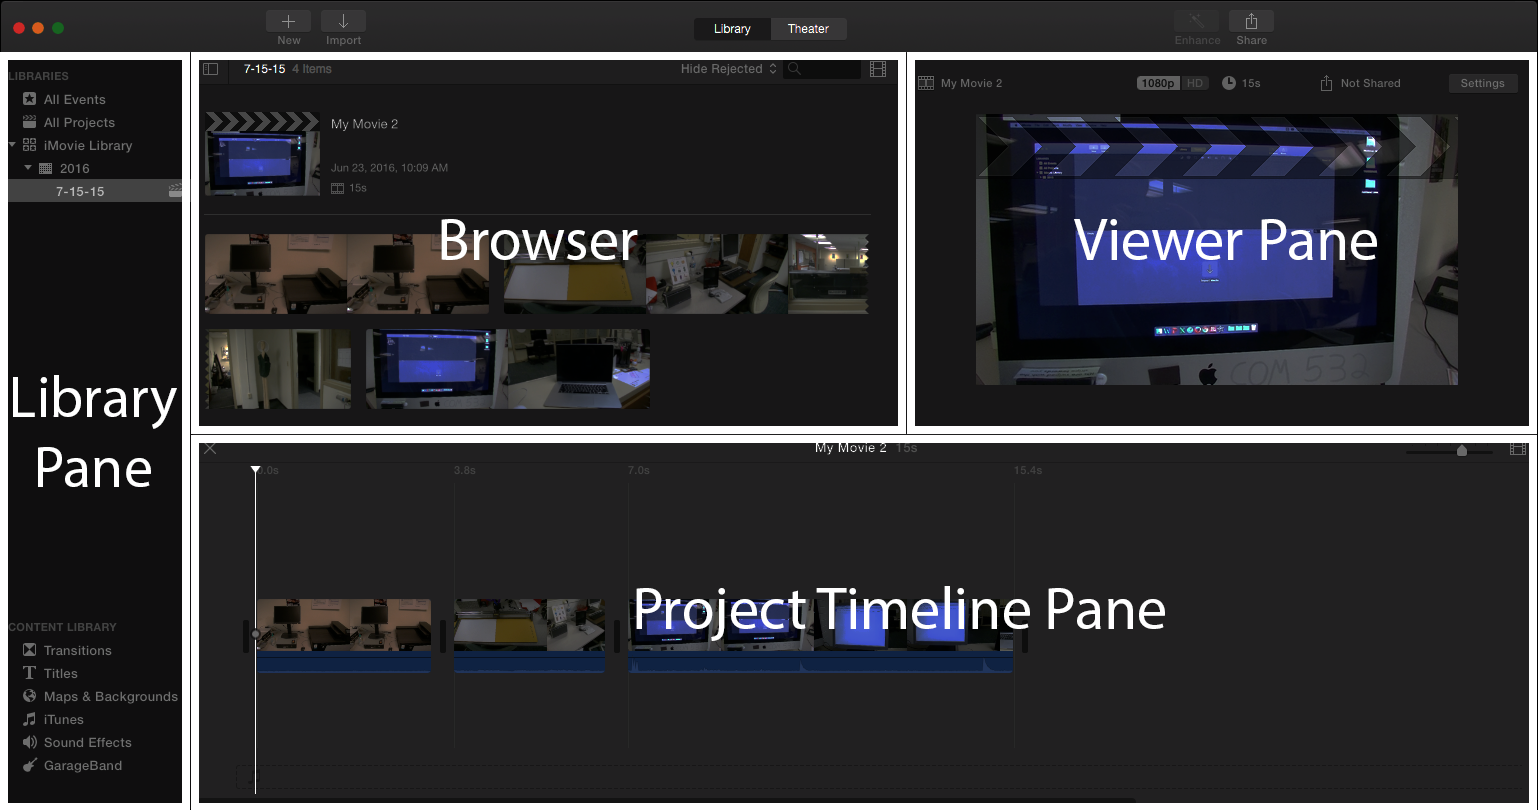
The Library Pane is where you locate all your assets. That’s going to be your uncut video, photo, and audio files reside. To use them, you just need to drag them over to the browser, where you’ll then have quick and easy access to your work.
The Project Timeline Pane is where you will see the items you’ve already chosen to be included in your content. This is especially helpful in visually seeing where you need to add transitions.
The Viewer Pane is exactly what it sounds like. When you select a clip from your browser to view/edit, you can watch the video playing on the viewer pane.
Windows – Video Editor
This is probably the least powerful option available to you, however I find that for simple video I prefer it over editing on my phone. There is very little functionality besides the ability to cut and delete bits of footage.
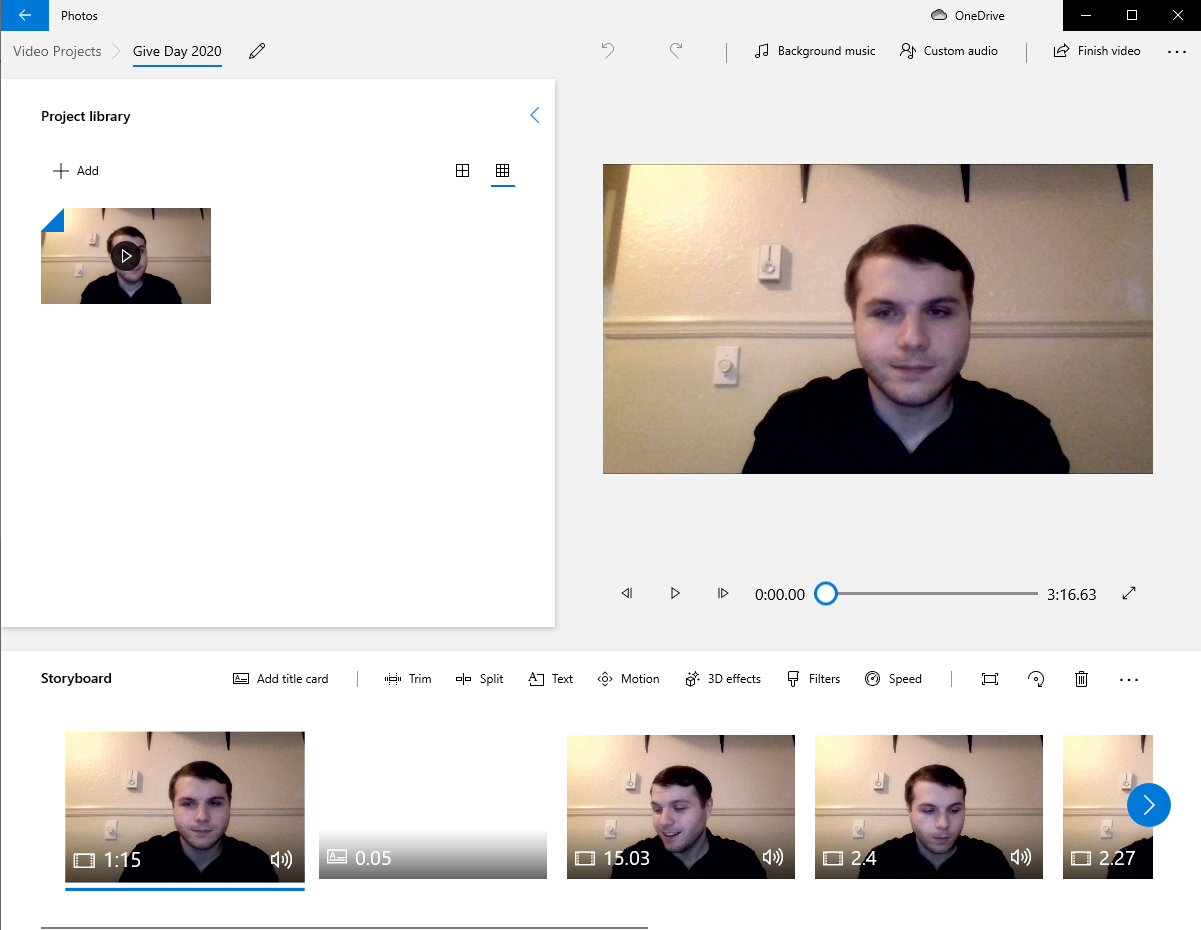
The layout is very similar to iMovie, barring that the Library Pane and Browser are one in the same. You will also notice that audio files are added from a unique location in the top right of the screen, instead of sharing a space with the browser. There’s not much in the way of transitions in Video Editor, so choose what sorts of content you keep that in mind when planning your content if you intend to use this for editing. I recommend using this primarily for webcam testimonials and vlogs. Rapid quick cuts and short white flashes of a blank title card are effective for this sort of video.
Example: I intended to use Windows Video Editor for my previously mentioned news-cast video. The content didn’t require any notable transitions outside of switching from any of the three camera positions. In my last example, I mentioned how I accidentally deleted an important piece of footage due to poor planning. I took some time and weighed my options, looking at the footage I already had. I wound up deciding that not only was I missing an important scene, but the idea really didn’t deliver what the client needed of me. With that, I decided to rerecord my entire testimonial section and instead have that stand alone as the video content. I was able to take a 7+ minute sketch down to a 3-minute testimonial which better served my client’s needs. I then decided to make a duplicate file and edit it down further until it was only 1-minute, which allowed me to post the video direct to Instagram, one of their preferred social media channels.
Note: I also ended up having to do a reshoot to get my closing statement on the shortened version.
4) Publish and Monitor Your Content
That’s really it. Upload your video to your preferred channels. These could be YouTube, Facebook, Instagram. The list is endless. Just make sure that whatever you choose best suits your clients needs.
Monitor the content through its lifecycle and see how you did. Rewatch your content with a critical eye and compare it to others. See what you like, see what you dislike. The only way to get better is to complete as much content as possible and learn every time that you do.
Next Steps
For most folks out there you’re not going to find yourself going beyond the confines of this blog. However, if you keep this up and find that you want to expand there are hundreds upon thousands of articles and YouTubers out there that can help you on your journey. As a rule of thumb, I’d recommend upgrading your set up according to wherever your weakest link is between your Stage One (Camera & Microphone) or Stage Two (Computer & Software) tools as a package. A good computer can only make use of as good of software as you own, and good software can only be used by good computers. Likewise, crisp visuals mean little without equal audio, and vice versa.
As a final note, just remember that equipment is no replacement for ability. Jimi Hendrix on a Wallmart guitar would still sound better than me on a $10,000 Les Paul. Just practice video editing as much as possible, and you’ll be producing quality video content in no time.